Often times people think of business people and college kids when they think of smartphones like the iPhone, but there are plenty of stay-at-home/work-from-home parents who own iPhones and iPod Touches as well. That's why I've decided to share my top three app recommendations for the the home:
Grocery iQ- This is one of my favorite apps because it allows my husband and I to share a single grocery list. It syncs between our phones so he can add something to the list from work, it'll automatically add it to my phone, and when I purchase the item and mark it off, it automatically removes it from the list on his phone so he knows he doesn't have to stop at the store. This app also has lots of coupons, a favorites list for commonly purchased items, a store locator and it can save your savings cards so you don't have to carry them with you.
Betty Crocker- The Betty Crocker app is one of my favorites for those "I need to use this up before it goes bad" times. You can search through recipes by ingredients ("I have kielbasa and black beans..."), browse by main ingredient "What can I make with chickpeas?" or search recipes by name "Lets make chicken enchiladas." Once you find a recipe you like, you can save it right in the app so you don't have to search for it all over again.
Mint- There's a reason stay-at-home parents are also called home economists. Mint is a financial app that ties into a website that helps you manage and track your finances with ease and sans jargon. It's easy to make a budget, link your credit cards and bank accounts, and then track how you're doing on your budget right from the app. Considering ordering dinner out? Open the app and see if it's in your budget to eat out this month. The website also allows you to track your loans and credit card balances so you have one place to see how far you've come in paying them off.
Practical Tip of the Day:
Have kids that like to play with your iPhone, but sometimes leave it in... odd places? Sign up for iCloud for free using your Apple ID (the log in you use to purchase apps) and then turn on "Find My iPhone" in your iPhone's settings. Lost phone? Go to icloud.com, log in, and click "Find My iPhone." It'll use the GPS to locate your phone ("Oh good, it's not at the daycare center!") and from there you can send it a message (if maybe it IS at the daycare center) or make it ring, even if you left it on silent! The last part is particularly helpful if you're like me and often leave your phone silenced, and tend to find it between couch cushions or under a pile of stuffed animals.
Thursday, October 25, 2012
Tuesday, October 23, 2012
Should I Get The iPad Mini?
Today was another big day for Apple with plenty of announcements- new 13" MacBook Pro, Mac Mini, iMac, iPad and lots of software and technology updates like the new Fusion Drive, but the overwhelming take away for most people was of course the iPad Mini. We've been waiting for it, guessing about it, and now that we have it we must pause and ask ourselves "Should I actually get it?"

As usual, my answer is "Maybe. Depends on what you do," but here's the quick and dirty breakdown of its features. Keep in mind though that features don't determine whether or not you should get something. I recommend being able to think of at least three things you can do with it that you can't currently do or would be significantly better/easier with it:
As usual, my answer is "Maybe. Depends on what you do," but here's the quick and dirty breakdown of its features. Keep in mind though that features don't determine whether or not you should get something. I recommend being able to think of at least three things you can do with it that you can't currently do or would be significantly better/easier with it:
- Small enough to hold in one hand
- 7.2 MM thick (about the thickness of a pencil)
- .68 Lbs (about the weight of a pad of paper)
- Exterior is aluminum and glass
- Comes in either black or white (see photo above)
- Same pixel count as full-sized iPad
- 7.9" display (measured on the diagonal)
- Front and read facing cameras
- 10 hour battery life
- LTE option for cell service
- Starts at $329
All in all, I consider the iPad Mini to be a good place to start if you think you want an iPad, but don't want/have the money to spend on a full-sized one. That lower price point and size also make it better for children or teens or anyone who finds themselves in environments that aren't very tech-friendly.
If you're still not sure if the iPad Mini is right for you, feel free to contact me at www.TechKNOWLEDGEyToday.com and I'd be more than happy to help walk you through the decision. You can also follow me on Facebook and Twitter for updates and periodic tips and tricks to help you with the technology you use daily.
---
TechKNOWLEDGEy Today was founded on the idea that through better understanding of technology you can empower people to better their lives more than they ever thought possible. It is with this in mind that we strive to better our communities through the services we offer.
We provide personalized group or individual training on technology in your home or office. Specializing in Apple products like the iPhone, iPad and Mac, we offer purchasing and implementation consultations, software training and instruction on computing basics like the Internet, email and smartphones.
How Do I Make a Ringtone in Garageband?
Apple’s been enjoying a nice “halo effect” with their iPhones and iPads. With all the people purchasing those devices, many of them are also making the switch to using Macs as their primary computer. One of my favorite things to show new Mac owners who started with an iPhone is how to make a ringtone in GarageBand, Apple’s audio program that comes on every Mac.
The first step is to find a sound that you want to use that is non-copyrighted. Once you have the sound you want, open GarageBand and select iPhone Ringtone from the menu on the lefthand side of the screen that pops up. To the right of that menu, you’ll see three icons that say “Example Ringtone,” “Loops,” and “Voice,” respectively. Select “Loops” and then click the “Choose” button in the lower-righthand side of the screen.
Once you’ve done that, you should be prompted to name the ringtone, asked where you want to keep it, set the tempo, signature, beats-per-minute and key. The only thing you need to change from the default is the name. Give it a name descriptive enough that you’ll be able to find it in a list. “Ringtone 1,” for example, isn’t descriptive, but “Fluffy Barking” is (if, in fact, the sound is your dog Fluffy barking).
Once you hit “Create” the main GarageBand window will open up and you’ll see four instruments listed on the lefthand side and their respective loops (small segments of their sounds) to the right. Click on the instrument on the right and click on “Track” from the menu bar and then click “Delete Track.” This can also be accomplished by selecting the instrument on the right, holding the command key and tapping the delete key.
After that, simply drag and drop your audio file into the GarageBand window and use the yellow bar towards the top of the screen (below the ruler-looking bar) to adjust which part of the audio file you wish to use as your ringtone. You do this by clicking-and-dragging the ends of the bar to mark the beginning and end of the click you want. Hitting the play button on the bottom of the screen (the triangle pointing to the right) will play the part of the clip you’ve selected. This will help you fine-tune your timing. Remember, you only have 13 seconds for your ringtone length!
Once you’re happy with how your ringtone sounds, click on “Share” in the menu bar at the top of the screen, then select “Send Ringtone to iTunes.” GarageBand will work its magic, iTunes will open up, and the ringtone will be added to your library! Sync your iPhone and your ringtone will be added to the list of options.
Practical Tip of the Day:
Forgot how to change your iPhone’s ringtone? Tap on “Settings” (the icon that has grey gears on it) and then “Sounds.” You’ll be able to change all your sound settings there, including when you want a particular ringtone to be used.
Thursday, October 18, 2012
iPhone Camera Tips
Have an iPhone and love the fact that you have a camera at the ready almost always now? Here are some short tips to make taking an excellent photo even easier:
Tap to focus- Yes, the iPhone does auto-focus, but what if you just can't get it to focus where you want? Often times, I use it to adjust where it's adjusting for the light. Photo too dark? Tap on an area of the photo that's particularly bright. Too bright? Just the opposite. Need to focus on a something far away or particularly close? Simply tap on it and the iPhone will adjust the focus on it.
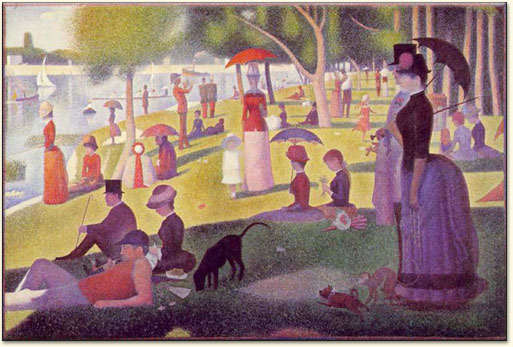
Grid- When you have the camera opened on your iPhone, under "Options" you'll see the choice to turn on a grid. This can help you make sure your horizon line is straight or that the walls in your photo aren't distractingly lopsided. It's also used for what art students refer to as the "rule of thirds." The idea is pretty simple- a piece of art is more interesting to the eye if the main contents of the photo are in fact NOT centered, but rather slightly off-center. Look at the example below. The man is laying along the bottom line and the upper limit of the items in the yard is along the top line.

HDR- The other option in the "Options" section is HDR. HDR stands for "high dynamic range," but don't worry if you forget that shortly- I doubt anyone will quiz you on this. What HDR does is take three photos right after another. One is over-exposed (too bright), one under-exposed (too dark) and one is normal. Then, the iPhone lays the photos over each other and the result is a photo that shows more detail in areas that would otherwise be too dark or too bright to see them in. See the photo below as an example.

Practical Tip of the Day:
Tired of just missing the perfect moment? You can actually hold down the camera icon, adjust the position of the camera as you'd like and then let up on the icon. The iPhone won't actually take the photo until your finger comes up from the icon.
Tap to focus- Yes, the iPhone does auto-focus, but what if you just can't get it to focus where you want? Often times, I use it to adjust where it's adjusting for the light. Photo too dark? Tap on an area of the photo that's particularly bright. Too bright? Just the opposite. Need to focus on a something far away or particularly close? Simply tap on it and the iPhone will adjust the focus on it.
Grid- When you have the camera opened on your iPhone, under "Options" you'll see the choice to turn on a grid. This can help you make sure your horizon line is straight or that the walls in your photo aren't distractingly lopsided. It's also used for what art students refer to as the "rule of thirds." The idea is pretty simple- a piece of art is more interesting to the eye if the main contents of the photo are in fact NOT centered, but rather slightly off-center. Look at the example below. The man is laying along the bottom line and the upper limit of the items in the yard is along the top line.
HDR- The other option in the "Options" section is HDR. HDR stands for "high dynamic range," but don't worry if you forget that shortly- I doubt anyone will quiz you on this. What HDR does is take three photos right after another. One is over-exposed (too bright), one under-exposed (too dark) and one is normal. Then, the iPhone lays the photos over each other and the result is a photo that shows more detail in areas that would otherwise be too dark or too bright to see them in. See the photo below as an example.
Practical Tip of the Day:
Tired of just missing the perfect moment? You can actually hold down the camera icon, adjust the position of the camera as you'd like and then let up on the icon. The iPhone won't actually take the photo until your finger comes up from the icon.
Tuesday, October 16, 2012
What iOS Apps Should All Small Business Owners Have?
It seems nearly impossible to run a small business without technology nowadays, and smartphones and tablets have gained a firm foothold in this market. When speaking with small business owners, they almost always ask which apps I consider “must haves.” Here are the top three iOS (meaning for Apple products) apps I recommend for people either running or looking to start a small business:
iWork/Quickoffice Pro- Every small business owner needs to look at and sometimes edit documents. Be it text documents, spreadsheets or presentations, being able to view and change them on the go is very helpful. If you own a Mac and use iWork, using the iWork apps will make for a seamless document transition between your iPhone/iPad and your Mac. If you use Microsoft Office either on the Mac or Windows machine, Quickoffice Pro will offer a similar experience for your Office documents.
TurboScan- Are you currently using your device’s camera to take pictures of documents? With TurboScan, you can turn those photos into multipage PDFs that you can then either save or email. That means you could take pictures of your receipts while you’re away on a business trip, turn them into a single PDF and email them to your secretary or simply keep them on your device for your records.
Square Card Reader- If you do any sales, either products or services, the Square Card Reader is highly recommended because it allows you scan credit cards and have the funds transferred right into your account. Now, as a quick side note here, Square makes their money on the 2.75% fee on every charge you make on their app, but they do also give you a free credit card scanner when you download their free app. Yes, a free scanner for downloading their free app.
Practical Tip of the Day:
Looking to connect with other professionals you know in a forum more formal than Facebook or Twitter? LinkedIn is a website that allows professionals to connect, keep in contact with each other and even offer referrals to each other. LinkedIn, in addition to their website also have a free app.
If you'd like more information about these apps and how to utilize them in your business, feel free to contact me at www.TechKNOWLEDGEyToday.com and I'd be more than happy to help walk you through the decision. You can also follow me on Facebook and Twitter for updates and periodic tips and tricks to help you with the technology you use daily.
---
TechKNOWLEDGEy Today was founded on the idea that through better understanding of technology you can empower people to better their lives more than they ever thought possible. It is with this in mind that we strive to better our communities through the services we offer.
We provide personalized group or individual training on technology in your home or office. Specializing in Apple products like the iPhone, iPad and Mac, we offer purchasing and implementation consultations, software training and instruction on computing basics like the Internet, email and smartphones.
Thursday, October 11, 2012
Should I Buy a New iPod or an Old One?
It's that time of year. Just in time for the holiday season, Apple has released new iPods. A new iPod Touch, iPod Nano and even a new iPod Shuffle have been announced, so inevitably the question comes up: Should I buy a new iPod or and older one? It honestly depends on several factors, but the main points we'll be looking at are changes, availability and price.
First of all, changes. Are the changes they've made really that big? For the Shuffle, no, but the Shuffle is so wonderfully simple that drastic changes to it are rare. For the Nano, yes, there are some major differences. For one thing, it's only 5.4 mm thick (or "5.4 mm thin" as Apple says) which is about .2 of an inch. That in addition to a larger touch screen and new colors make it a notable upgrade, but one I'd place in the "if you were already looking for a new MP3 player category." (Click here if you're not familiar with the difference between an MP3 player and an iPod.) Lastly, the new iPod Touch. Larger touch screen, colors, better camera and larger capacity make this a very tempting product indeed. As usual, the iPod Touch is Apple's "iPhone without the phone" and so it follows in the footsteps of the new iPhone 5 fairly closely.
Availability. Around the holidays many people consider getting MP3 players for their friends and family, and iPods are the most popular kind to get. That being said, Apple's timing for iPod releases is ingenious in that the new iPods will have high demand when they're released (as of today the Apple online store is estimating a 2 week waiting period) and once the new product rush is over the holiday rush begins. Unfortunately for us, that means that getting a new iPod in the color and capacity you want may be a bit challenging, especially if you pick a common combination like the 32GB silver iPod Touch. (If "32 GB" and "capacity" are confusing you, read this short article for a quick primer.) On the other hand, there are lots of people who have the previous version of the iPod who are itching to have the latest-and-greatest and so auction and sales websites like eBay and Craigslist will be flooded with iPods that are less than a year old and only one version behind.
The other nice thing about buying the previous generation iPod is that the price is much lower. Apple traditionally sells its older iPods online for a discount, but if you don't have your heart set on a brand-new device, buying a used one from the aforementioned sites can prove even cheaper and is a popular place to get an iPod for as little money as possible. (Buyer beware as always though when purchasing used electronics, especially from online sources.) Currently, Apple is advertising a $50 difference between two iPod Touches of the same capacity. That means that Apple thinks its upgrades are worth about $50. Do you agree? Have you ever purchased a previous generation iPod? Let me know in the comments section below what your experiences have been and if you plan on getting or skipping these new iPods.
(Don't forget to check us out on Facebook at http://www.facebook.com/TechKNOWLEDGEyToday and Twitter at http://twitter.com/techKnowToday )
 |
| The new iPod family (from left to right) the Shuffle, Nano and Touch. Shiny, aren't they? |
Availability. Around the holidays many people consider getting MP3 players for their friends and family, and iPods are the most popular kind to get. That being said, Apple's timing for iPod releases is ingenious in that the new iPods will have high demand when they're released (as of today the Apple online store is estimating a 2 week waiting period) and once the new product rush is over the holiday rush begins. Unfortunately for us, that means that getting a new iPod in the color and capacity you want may be a bit challenging, especially if you pick a common combination like the 32GB silver iPod Touch. (If "32 GB" and "capacity" are confusing you, read this short article for a quick primer.) On the other hand, there are lots of people who have the previous version of the iPod who are itching to have the latest-and-greatest and so auction and sales websites like eBay and Craigslist will be flooded with iPods that are less than a year old and only one version behind.
The other nice thing about buying the previous generation iPod is that the price is much lower. Apple traditionally sells its older iPods online for a discount, but if you don't have your heart set on a brand-new device, buying a used one from the aforementioned sites can prove even cheaper and is a popular place to get an iPod for as little money as possible. (Buyer beware as always though when purchasing used electronics, especially from online sources.) Currently, Apple is advertising a $50 difference between two iPod Touches of the same capacity. That means that Apple thinks its upgrades are worth about $50. Do you agree? Have you ever purchased a previous generation iPod? Let me know in the comments section below what your experiences have been and if you plan on getting or skipping these new iPods.
(Don't forget to check us out on Facebook at http://www.facebook.com/TechKNOWLEDGEyToday and Twitter at http://twitter.com/techKnowToday )
Wednesday, October 10, 2012
Important Announcements
Hello, everyone! You may have noticed that lately posts have been becoming a bit sporadic; I apologize for this. For those of you who know me personally, my husband and I are expecting a new little girl this month and I am also working on expanding TechKNOWLEDGEy Today into a full technology-training company serving Cortland, Tompkins counties and surrounding areas.
In these efforts I've added a separate website for the company- www.TechKNOWLEDGEyToday.com, a short promo video that addresses our "Why, What and How" (audio still to come), and have made updates to our Facebook Page, Twitter Feed, and Google+ Page. I promise to begin adding more content as soon as I am able to. In the meantime, follow me on the aforementioned sites to keep up with what I'm up to and feel free to drop me an email at TechKNOWLEDGEyToday@gmail.com with any questions or topic ideas.
As always, thank you all for your continued support,
Amanda
Thursday, October 4, 2012
What's the Difference Between JPEG and RAW?
This article goes out to my friends and family who've graduated from point-and-shoot cameras and have started to use more professional cameras. When the jump is made it's easy to get caught up in all the new functions and modes of a camera, but most people- when starting out at least- will use their new fancy camera the exact same way as their old one. For those who've moved on past that and can manually adjust their camera to get the shot they really want, the next question is how do you want the camera to save the photo?
Most mid-to-high-end cameras will give you the option of JPEG or RAW. JPEG is pretty familiar. It's the standard digital photo file for most programs and websites nowadays. RAW on the other hand you're unlikely to hear of outside of the hobbyist or professional circles. Unfortunately, some hobbyists hear pros talking about RAW and will start shooting in it without knowing the difference or what it's really for. The difference between JPEG and RAW is the difference between lossy and lossless. Let's unpack that a bit.
When you take a picture with a digital camera, the camera looks at what it was pointed at and makes a photo out of colored pixels. Think of it like this famous pointillism picture:
This picture is actually made up of thousands of tiny dots, but because they're so small you generally won't notice them. Digital photos are the same way. The dots (in this case pixels) are so small you don't notice them unless you zoom in really close. Ever seen a picture that looks kind of blocky? That's what happens when you can see the pixels. Now, when you have a picture that's lossless (in this case, RAW) every pixel is saved exactly how the camera captured it, hence the name "raw." If the camera is set to save it as a JPEG though (lossy) is will look for pixels that are close enough to each other in color and set them to be the same, "throwing out" the information about those small differences. Hence, losing them.
So why in the world would someone pick JPEG instead of RAW? Well, by keeping all that information, a RAW photo will be significantly larger than a JPEG photo. A high-quality JPEG will take up about 2-3 MB of space for example, but a RAW will be closer to 11-12. This means that you can fit about 4-6 JPEG photos in the same amount of space as a single RAW one. This large file size also means RAW photos are slower to open, edit and save.
Practical Tip of the Day:
If you have a camera with the option and want to start shooting in RAW, you'll soon find that you can't send RAW photos to your friends or family. Most consumer photo programs don't support RAW and therefor won't be able to open it. What photographers typically do when they need to share their photos with a non-professional is they export it as a high-quality JPEG. ("Export" means saving a copy as a different format.) Most consumers won't notice a huge difference, the file will be much smaller, and it's a more universal standard so it lowers the chance of a program not accepting it.
Subscribe to:
Posts (Atom)